


 Please bare with me as I make some layout changes :)


Hi! I’m Rosie from Sweetapolita, and wow, I can’t help but feel even more inspired and uplifted as I step into Chelsea’s colourful and whimsical world here at Paper*Cakes Finds.
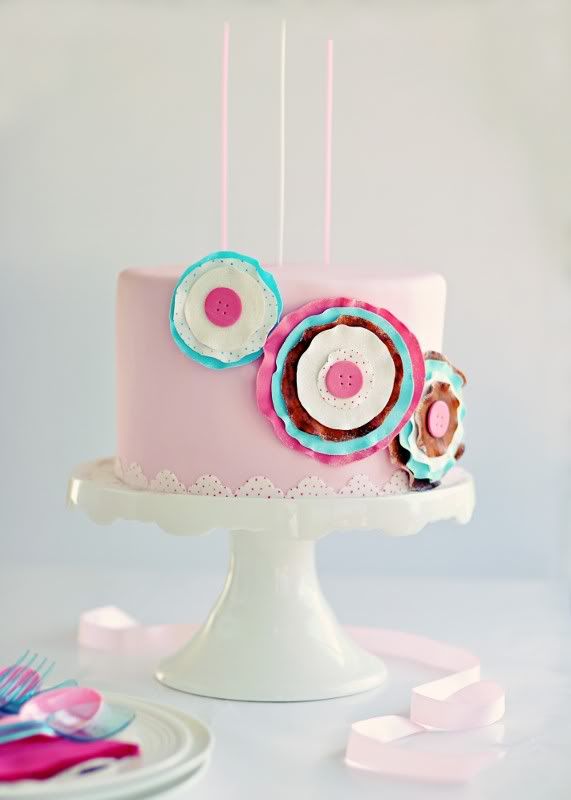
I love this place! I was so excited when she asked me to write a cakey guest post, and I thought it would be fun to create something really playful and crafty for you, which is how the Paper-Craft Sugar Posy Cake came to be—it seemed a perfect fit for such a paper-crafty blog run by a paper-crafty queen! All paper-craft posies on this cake were made from gum paste (a pliable sugar dough), and overall the project is approachable and, most-importantly, super fun and creative. Once you know the technique, you can run with it to make your own cake, mini cake, or even cupcake toppers. Although the overall feel of this cake is whimsical and sweet, I can definitely imagine incorporating these posies into a wedding cake, shower cake, or pretty much any party cake at all.
The really neat part about this technique is that, since the posies mimic real craft paper, the colour and pattern combinations are virtually endless, and you can tailor it to your own style and colour-scheme. I used the Paper*Cakes Finds blog design colour-scheme as inspiration (there sure is infinite inspiration here!), with a bright pink, hand-painted pink & blue polka dots on white, turquoise, glittered white, and my favourite: the glittered-edge wood grain layer. I have included a step-by-step tutorial below, but thought I’d share a few photos of both where I got my inspiration as well as my photos of the posies in the works:
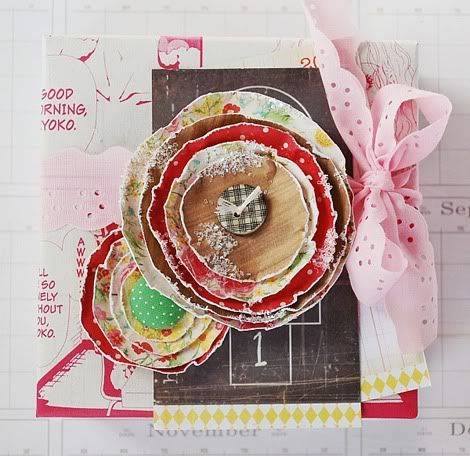
I came across this adorable photo while researching all types of paper crafts, which is where my specific glittered posy concept began—aren’t these gorgeous paper flowers? These are actually made of real paper and glitter, and although I love that idea, I tend to think in sugar, not paper, so there it began! What’s great about paper crafts as inspiration is that you get a pretty accurate visual of what your sugar version is going to look like. You can almost follow the paper craft tutorial to recreate them in sugar, so it’s just an all-around fun way to work.
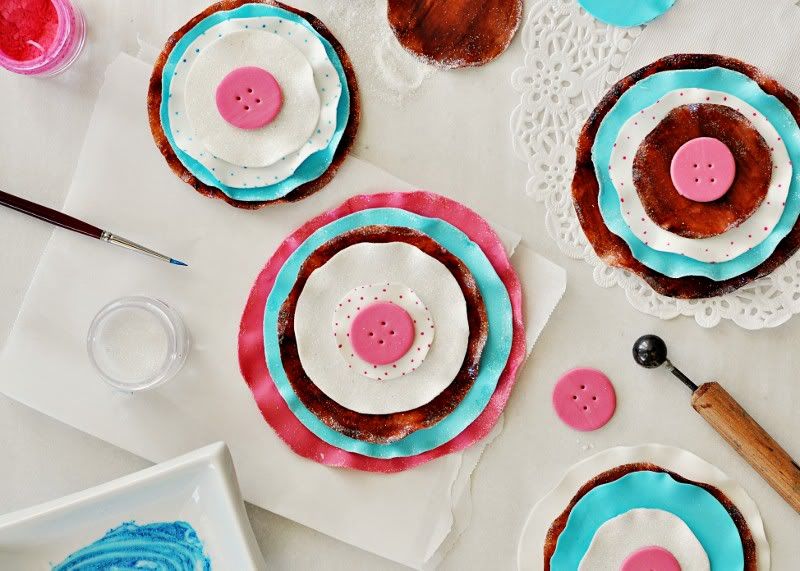
Is it just me, or is this just plain crafty, sugary, glittery fun? These really were quite simple to make, and after I began working on them, I was overcome with endless ideas for future cakes using this technique. It also offers another element of art which I am so drawn to, which is the trompe-l’oeil effect, because these Paper Craft Posies look so paper-like, most people would be fooled to think you’ve made a paper decoration and applied it to the cake. Not only do they look very paper-like, but the wood grain effect is so realistic that you’ll really have them confused. Love that!
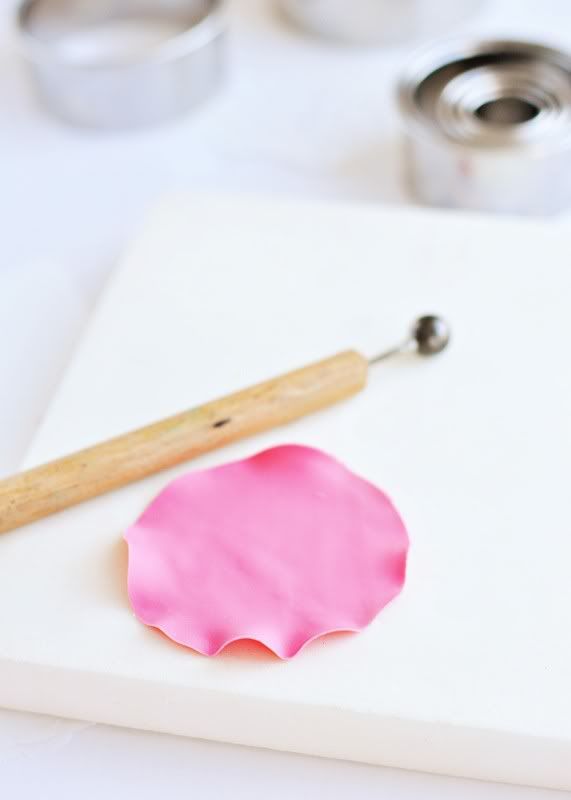
Here’s one of the gum paste circle layers after having the edged ruffled using the ball tool. If you love cake decorating, or even if you’re just getting into it, I highly recommend the ball tool. It’s really the only way to achieve that paper-thin ruffled edge for realistic flower petals, and, of course, unexpected flowers such as these.
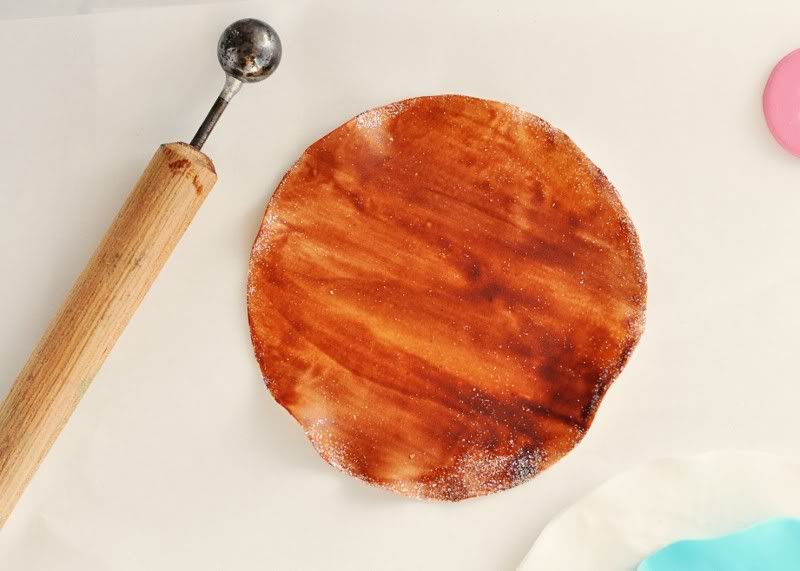
Here’s a close-up of the wood grain effect with glittered edges. It’s amazing how a little marbling of some white and brown gum paste and a quick brush of pale brown edible paint can create such a realistic finish. I think what I love most about this one is the unexpected combination of glitter and wood. Who knew they belonged together? Sadly, the glitter doesn’t twinkle in the photos the way it does in person, but I promise it’s lovely!
Here are some of my circles ruffled and drying. I really love how paper thin you really can get gum paste—there’s nothing like it to create this kind of texture and finish. I used to make my own, which was very empowering, and I have no idea why, but then I began using Satin Ice brand, and I’ve never looked back. It just seems stronger, can roll thinner, and dries even more porcelain-like—quickly. I feed my rolled pieces of gum paste through my pasta machine until it’s as thin as possible. The thinner it is, the more fragile, but if you’re careful with it, it’s worth it to have it so thin; this also comes in handy when making highly realistic flower petals.

Once dried, painted, glittered, and assembled, they adhere to a fondant-covered cake very easily using royal icing, or if you’re adding them to a buttercream cake, you can just place them onto the cake directly. I’ve added a white fondant trim and painted with coordinating polka dots, to tie it all together.
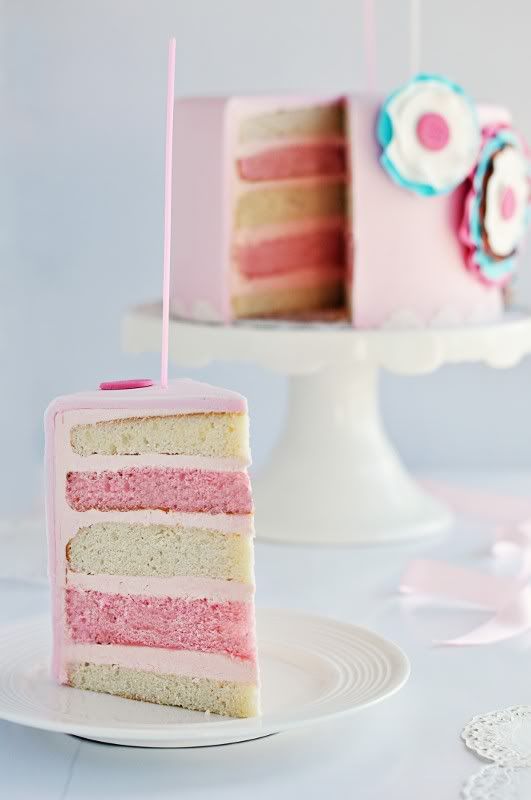
And, well, just for fun, why not dye some vanilla cake layers pink, fill it with some pink Swiss meringue buttercream, and top it all with pink fondant? A perfect starting point for Paper Craft Sugar Posies! I used my Very-Vanilla Butter Sponge Cake recipe and a tiny bit of AmeriColour Electric Pink gel colour to get the pink layers, as well as the pink fondant and buttercream.
If you’d like to create these for your cakes, here is the how-to:
Tools:
Gum Paste (approximately 10 oz, depending on desired number of posies)
Small rolling pin, 9”
Pasta Machine (optional, but if you have one you’ll want to dust if off and use it!)
Ball Tool
Foam Pad
Disco Dust in Pixie Dust
Gel colours (your choice, but I used AmeriColor Sky Blue, and SugarFlair Pink and Dark Brown)
Luster Dust (Sterling Blue Bell, Sterling Ultra Pink)
Pure Lemon Extract
Small & Medium Paintbrushes
Round Circle Cookie Cutters, varying sizes
Parchment Paper
Royal Icing
Steps for Glittered White, Polka Dot, Pink, and Turquoise Layers:
1. Divide gum paste and, using gel colour, dye desired colours. Leave enough white for glittered white and polka-dot circle layers.
2. Using a golf-ball size of gum paste and small rolling pin, roll it out until paper thin. If using a pasta machine, start feeding through the machine at about 1/8” and continue to feed through, repeating and decreasing machine thickness by 1 notch each time until at thinnest setting. If not using a pasta machine, roll as thin as you can get it with your rolling pin on a non-stick surface.
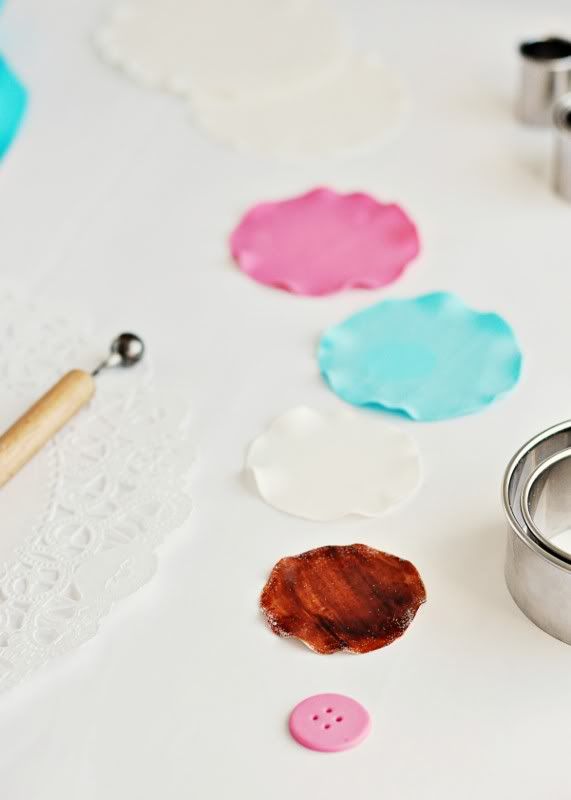
3. Cut circles using your desired sizes. I use the Ateco 11-piece nested circle cutters, using every 2nd size (leaving the smallest for the button detail). You will want to cut extra circles due to breakage, or even just to experiment with the painting, assembly, etc. Since the gum paste dries so quickly (which is good news and bad news!), you will want to limit your cutting to about 6 circles at a time, to allow time to ruffle edges while they are still malleable.
4. Place your circles, one or two at a time, on the foam mat, and with the large end of your ball tool, trace the very edges of your circles all the way around, repeating until desired ruffling is achieved. Set aside to dry.
5. Repeat this step until you have all of your circles complete (in addition to the glittered wood grain circles, which we’ll be getting to). You should have varying sizes of pure white both to be glittered and painted, as well as pink and turquoise.
6. Once dried to porcelain finish (overnight, if you can, otherwise at least 4 hours), it’s time to put the finishing touches on them. For polka dot layers: mix a tiny bit of luster dust in a small dish mixed with some lemon extract until you get the consistency of watercolour paint (this is personal preference, so just experiment). Using a small paint brush, paint dots in desired colours. Set aside to dry. For fully-glittered layers: using a piece of parchment paper with a nice sharp crease in centre, place white layer (with a thin layer of water painted on top) and sprinkle Pixie Dust over it generously, flipping the layer gently using the parchment paper, until completely glittered. Shake off excess glitter and set layer aside to dry.
7. Paint the edges of the coloured circle layers with a thin layer of water, and dip them into the glitter. Set aside to dry. You can then, using the sharp crease in the paper, feed the remaining glitter back into its little glitter jar, ready for your next project.
Steps for Wood Grain Layers:
8. Divide approximately a ball of gum paste (about the size of a plum) in 2, leaving one half white, dying the other light brown with your gel colour. Roll both colours into long snake rolls, then braiding together, fold over once or twice and roll out with rolling pin, creating marbled effect. Repeat steps 2-4 above.
9. Once completely dry, mix a drop of brown gel colour into approximately 1 tablespoon of lemon extract, mixing with a medium paintbrush. Paint a thin layer of the “stain” over the circle, and another a few moments after. The more irregular the pattern, the better, to appear more realistic.
Buttons
10. Roll pink gum paste to about 1/8” thickness and using small circle cutter, cut your buttons. While the button is still malleable, use any sharp-pointed tool to create small “thread holes.” Let dry.
Assembly:
11. Layout your circle layers and arrange in desired order. Using a small dab of royal icing, gently attach layers, finishing with the button. Be careful, because the paper-thin dried gum paste is fragile. Let them dry several hours.
Now that you have your posies complete, you can attach to a fondant cake with royal icing (I use pins to keep them in place while the royal icing is drying). You can also attach to a buttercream cake, by simply sticking with the buttercream itself. They can get weighty with all of the layers and glitter, so if attaching to a buttercream cake, you will want to ensure that you don’t suspend them too high, and that they are secure.
I hope you find some inspiration in this quirky technique, and I want to say a big thank you to the one-and-only Ms. Paper*Cakes for welcoming me today!
Good luck & enjoy!
Love, Rosie xo


11 comments:
Yum! And also so darn pretty!
How fun. Now I just need a little girl to bake the pink cake for... :)
You are my hero!! Can I be just like you when I grow up??
So gorgeous! You are so creative and I love the idea of layering two different flavors of cake.
Buy WoW Account
Your cake is beautiful Rosie and it's unbelievable how papery your posies look. Amazed at your teeny tiny polka-dot border.
wonderful idea, lovely cake
Rosie is so talented. Love her cakes so much!
Rosie never ceases to amaze me with her incredible eye for detail, she's so very talented.
Another gorgeous cake Rosie! Love the flower posie technique, I can't wait to give this a try, such a fun idea, love the colors you picked!
This is such a fun guest post. Rosie is so talented, a great combo with your blog. Gonna poke around & see what else you have here.
LOVE this cake, what a talented baker!!
Post a Comment